SOA Suite 11g comes with Oracle business rules engine. It is very useful in defining business rules external to application. This engine also provides user friendly wizard to allow easy and quick means of modifying the rules, which can take immediate effect.
In this blog, I would demonstrate how business rules engine in SOA can be used to easily define various business specific rules and also change them without impacting the code.
Let’s
consider the following business scenario where we can implement validations using IF/THEN rules.
An
online order management system takes orders from customers. This business rules
project checks if customer is eligible for any discounts or offers, based on
various parameters and business rules.
Steps to create the project :
1. Create a simple SOA project say OfferEligibilityCheck.
2. In the composite.xml, right click and
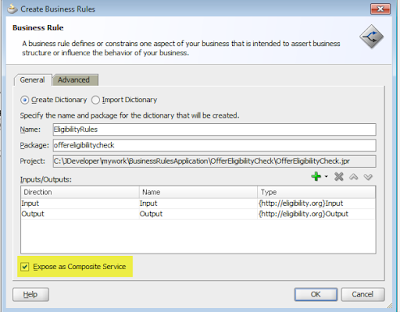
insert a business rules component. You can also drag and drop the Business Rule
service component from the Component Palette to composite.xml. Name the
component as EligibilityRules.
3. Choose the input and output of the business
rules component from the project schema.

Plan.xsd is a simple schema and looks as follows:
4. Make sure Expose as Composite Service checkbox is checked and then click ok.
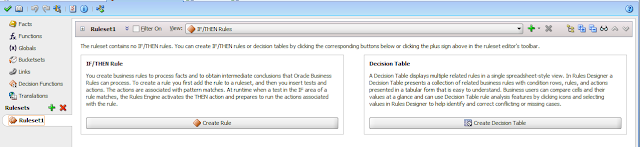
7. Facts tab
will show the input and output elements as the xml facts that will be validated.

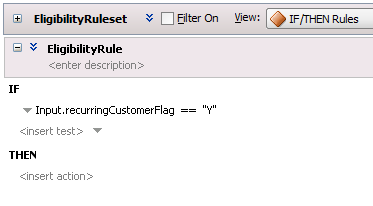
8. Go back to the Rulesets tab and click on Create Rule. This will open an editor screen which will allow us to write the if/then rules.
9. Rename Ruleset1 to EligibilityRuleset and Rule1 to EligibilityRule.

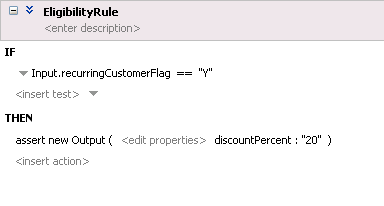
10. The section under IF allows us to add the test conditions, whereas the section under THEN allows to add the actions to be taken once the test conditions are satisfied.
11. Following conditions are to be checked.

15. Now add the right sided operand with a constant value ‘Y’. Make sure that the constant check box is checked. The expression looks as follows.
16. You can also select the == and change the operator to ‘!=’,’>’,’<’ based on your requirement.
17. If recurringCustomerFlag is Y, then 20% discount should be given. Hence, DiscountPercent tag in the output schema should be populated with value 20.
18. Click on <insert action> under the THEN statement to populate the values in output schema.
19. Select assert new. Click on <target> and choose the output variable which is ‘Output’.
20. Now click on <edit properties>. A popup shows up with all the fields in output schema.
21. Enter the Value corresponding to discountPercent field as “20”. Check the Constant column. Click ok once done.


Plan.xsd is a simple schema and looks as follows:
<xsd:schema
xmlns:xsd="http://www.w3.org/2001/XMLSchema"
xmlns="http://eligibility.org"
targetNamespace="http://eligibility.org"
elementFormDefault="qualified">
<xsd:element
name="Input">
<xsd:complexType>
<xsd:sequence>
<xsd:element
name="CustomerName" type="xsd:string"/>
<xsd:element
name="RecurringCustomerFlag" type="xsd:string"/>
<xsd:element
name="PurchaseAmount" type="xsd:string"/>
<xsd:element
name="OrderDate" type="xsd:dateTime"/>
<xsd:element
name="PaymentMethod" type="xsd:string"/>
</xsd:sequence>
</xsd:complexType>
</xsd:element>
<xsd:element name="Output">
<xsd:complexType>
<xsd:sequence>
<xsd:element
name="DiscountPercent" type="xsd:string"/>
<xsd:element
name="FreeShipping" type="xsd:string"/>
<xsd:element
name="Status" type="xsd:string"/>
</xsd:sequence>
</xsd:complexType>
</xsd:element>
</xsd:schema>
4. Make sure Expose as Composite Service checkbox is checked and then click ok.

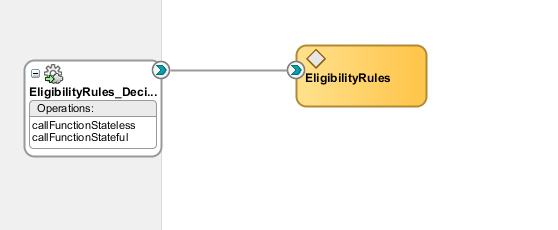
5. Composite.xml would look as follows once the above step is
complete.
6. Double click EligibilityRules component. Following screen will
open.


8. Go back to the Rulesets tab and click on Create Rule. This will open an editor screen which will allow us to write the if/then rules.
9. Rename Ruleset1 to EligibilityRuleset and Rule1 to EligibilityRule.
10. The section under IF allows us to add the test conditions, whereas the section under THEN allows to add the actions to be taken once the test conditions are satisfied.
11. Following conditions are to be checked.
Repeating customer –
a.
Repeating Customer gets 20% off
b.
If purchase amount >= 50, free shipping
New customer –
a.
If purchase amount >= 50, free shipping
b.
If purchase amount >=100, 15% off
12. Click on
<insert test> to start writing the conditions.
<operand>
== <operand> appears.
13. Click on
left hand sided <operand>. A drop down appears showing all the variables
of the project that can be used for the conditions.
14. Select recurringCustomerFlag
in the left side operand.
15. Now add the right sided operand with a constant value ‘Y’. Make sure that the constant check box is checked. The expression looks as follows.

16. You can also select the == and change the operator to ‘!=’,’>’,’<’ based on your requirement.
17. If recurringCustomerFlag is Y, then 20% discount should be given. Hence, DiscountPercent tag in the output schema should be populated with value 20.
18. Click on <insert action> under the THEN statement to populate the values in output schema.
19. Select assert new. Click on <target> and choose the output variable which is ‘Output’.
20. Now click on <edit properties>. A popup shows up with all the fields in output schema.
21. Enter the Value corresponding to discountPercent field as “20”. Check the Constant column. Click ok once done.

22. Final
expression looks as follows
23. Now finish writing all the conditions and actions as mentioned in Step 11. Complete rule set looks as follows.
There are 5 rules in the above ruleset –
EligibilityRule, EligibilityRule2, EligibilityRule3, EligibilityRule4 and
EligibilityRule5 which would validate the conditions mentioned in point 11.
24.
You can
also use the operand between for
EligibilityRule2 instead of > and <.
25.
Once the
above rules are coded, we can deploy the project and test the rules.
Testing of above business rules composite:
1. Business
rules composite can be deployed like any other composite to weblogic server.
2. In order
to test the Business rules composite, some mandatory parameters have to be
passed as input apart from the parameters required for the rules.
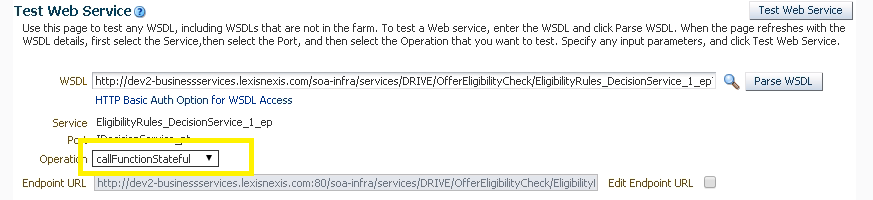
3. Select the
operation as callFunctionStateful when testing the composite from em console.
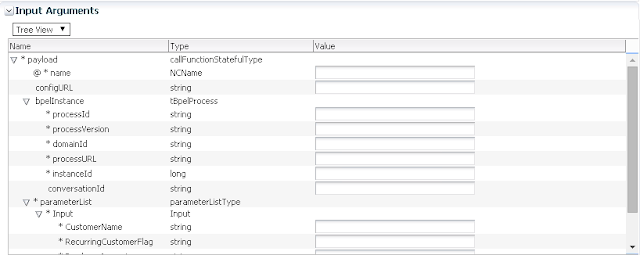
4. The input arguments
screen for business rules composite looks as follows.
a. Under
payload, there is a @*name field, which is mandatory for testing and needs to
be correct.
b. The
section under bpelInstance has bpel related fields which are mandatory as well,
but need not be correct. Any random value can be entered.
c. The
section under parameterList is the actual input payload from where the input
data is pulled out.

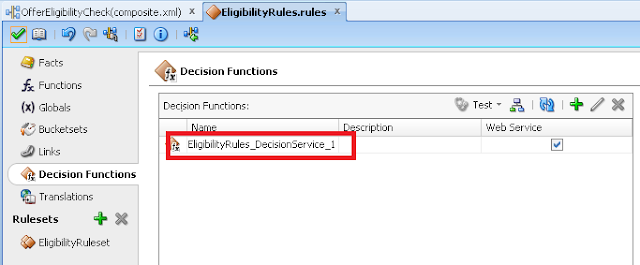
5. @*name is
the Decision Service name in the composite. It can be found in the Decision
Functions tab in the rules window or in the .decs file in the project (as
decision service name).
Decision Function Tab:

.decs.file

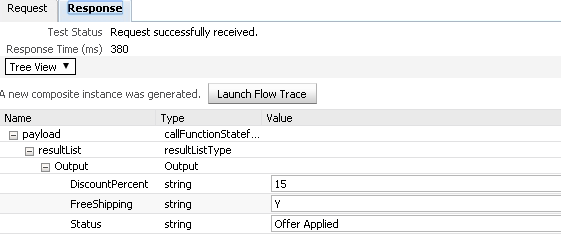
We will test with the following data
When the above input is subjected, the business rule component checks the rule that is applicable and return the result as follows.
In order to check which rule got executed, we can got the audit trial and check the execution trace.
For our test input, EligibilityRule3 got executed.
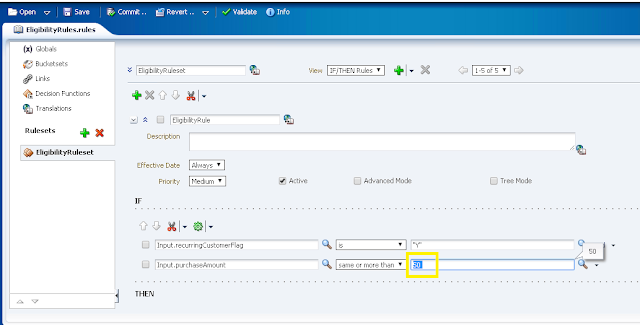
Changing the rules through SOA Composer:
We might encounter many cases where the business rules need to be changed quite often due to business requirements.
For example; we would want to change the current rule of Recurring Customer = Y and PurchaseAmount >= 50 to
Recurring Customer = Y and PurchaseAmount >= 25.
We can make this change easily through SOA composer, without the need to touch the actual code.
1. Login to soa composer - http://localhost:8080/soa/composer
2. Click on Open -> Open Rules.
3. A popup browser would be seen with all the business rules. Open the EligibilityRules one.
4. The screen similar to what you see in Jdeveloper would be seen here.
5. Click on Edit.
6. Make the change to the applicable rule and save and commit.
Screen looks as follows :

So, here's how business rules work in SOA.
In the next blog, I would show how to work on Decision tables in Business Rules.
Nicely written, this explains each and every step very clearly. very helpful in understanding the concept.
ReplyDeleteThankYou
Kuldeep
Thank you
DeleteThanks for sharing This Good Information
ReplyDeleteOracle SOA Online Training
nice post.
ReplyDeleteSAS online online training
structs online online training
Webmethods online online training
Wise package studio online online training
Python Django online online training
Thanks for sharing this great information I am impressed by the information that you have on this blog. Same as your blog i found another one Oracle SOA Interview Questions and Answers
ReplyDelete. Actually, I was looking for the same information on internet for
Oracle SOA Training and came across your blog. I am impressed by the information that you have on this blog. It shows how well you understand this subject, you can learn more about Oracle SOA Tutorial also.
hadoop online training
ReplyDeletemulesoft online training
linux online training
etl testing online training
web methods online training